*Meat Free Tuesday* The Foolproof One Stop Masala For Virtually Any Indian Vegetable Dish

I have been extremely tardy with my *Meat Free Tuesday* posts the last few weeks!  It all started so well, but then I got caught up in friends and family time and never got around to posting.  Rest assured, I have continued with the ritual, albeit not blogging my efforts!  For this reason, I have a special post planned for next week that should make up for the missed entries.  Some hints as to the theme are that it will be spicy, sweet, savoury, refreshing and all about the outdoors! I hope you will come back to check it out!

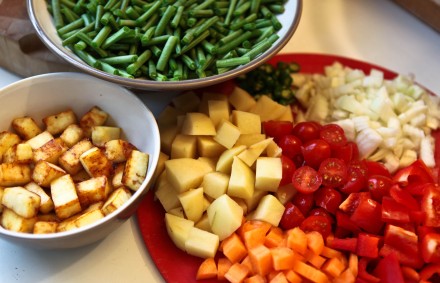
In the meantime, I am sharing with you a simple, but favourite vegetarian dish of mine.  When I was a child I would always looked forward to this for two reasons: firstly because it contained paneer (Indian soft cheese), one of my favourite things to eat as a child and secondly it was always so colourful; you eat with your eyes first, right? My mother wouldn’t make this very often as my father prefered paneer in the bhurji style (crumbled and soft like scrambled egg) .  In this dish the paneer in compressed into blocks, cubed and then fried- you can buy both the blocks and pieces- fried and unfried at both Indian and regular supermarkets all over the UK.  If you buy the blocks, simply cube and deep or shallow fry until a gentle golden edge is achieved evenly.  A home made version is tastier and softer, but a little time consuming. It all boils down to the milk (no pun intended :) ) I say this because in Canada, the store bought paneer is excellent and I am sure it’s down to the milk.  I highly recommend the Canadian brand Guru Nanak if you have that in your area- saves a lot of time!   In the following weeks I shall be dedicating a post to paneer with a recipe of how to make your own at home as it’s a useful ingredient to make for use in both sweet and savory recipes as well as a great way to use up excess milk!

My mother would tend to make this dish when we had people over as it contains no real objectionable vegetable for the token fussy eater to dislike and so the chances are that it would be enjoyed by all.  The other reason I have chosen to share this recipe is because it is extremely versatile meaning that you can substitute other vegetables that you have to hand.  What makes this dish is the masala base.  If you can master this, you can apply this to virtually any vegetable combination with minor adjustments and or additions.  Each combination will taste different as the masala will enhance each vegetable’s natural flavour.  This recipe is simple, quick and delicious.

Mum’s Mixed Vegetable Subzi

Ingredients

For the base masala:

1 onion finely chopped

1-3 green chillies chopped finely (the long thin kind you get in Indian grocers Rocket chillis.  They have the best flavour and aren’t ridiculously hot- a less hot version of Thai bird’s eye chilies.  If in North America, I prefer the flavour of Jalapeno to Serrano chilies, but I have found Rocket chilies in some specialist stores there, too)

a handful of baby plum tomatoes halved/ the equivalent of what you have to hand or 1/2 a tin

1 tsp cumin seeds

2 1/2 tsp ground coriander

1/2 tsp garam masala plus extra for sprinkling

1/2- 3/4 tsp turmeric

1/2 tsp red chili powder (to taste, also bear in mind the heat you get from your green chilies and adjust accordingly)

salt to taste

3-4 tbsp oil

Additional spices specific to this dish

1tsp mustard seeds

1 tsp fennel seeds whole

1 tsp fennel seeds crushed for sprinkling

The Vegetables

1 carrot cubed

1 large or 2 small red peppers cubed

3-4 golf ball size potatoes cubed

1 pack of fine Kenya beans or fine french beans (about 200-250g) cut into 2cm pieces

To make it colourful- throw in some sweetcorn too if you have it

1- 1 1/2 cups cubed and fried paneer

coriander to garnish

Method

  1. To prepare the base masala that you can use with almost all vegetables, heat a wide based pan with 3-4 tbsp oil to a moderately high heat.
  2. Add the cumin, and for this particular recipe also add the mustard seeds and whole fennel seeds and allow to splutter.  You can use the mustard seeds with most vegetables also, but the fennel seeds tend to only marry well with certain combinations such as with aubergine, bitter gourd and okra- although for my taste, I wouldn’t put mustard seeds with either of the last two.  There is no wrong or right, per se- you just need to experiment and find the flavour combinations that you enjoy.
  3. Next add the onions and green chilies and allow the onions to become slightly translucent.  You do not need to caramelise them. About 5 mins.
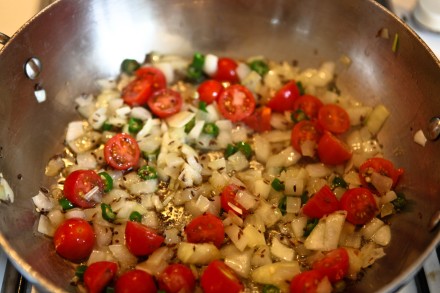
  4. Then add the tomatoes and cook to soften them and you start to see the oil separating.  About 5 mins. (See picture above)
  5. Next add the ground spices- turmeric, coriander, red chili powder and salt.  (I always use about 1 1/2 tsp for most dishes and it’s fine.  You can adjust later too)  Fry these for a minute. Do not let them touch down in the pan.  This is now your base masala complete.   (See picture above)
  6. Now add all the vegetables and on high heat stir well to coat the vegetables with all the masala.
  7. Bring pan to a steaming heat and before putting on the lid to steam, sprinkle over the crushed fennel seeds and garam masala. For other vegetable combinations I would just use the garam masala, but it is not an essential stage- it can be omitted.
  8. Put a lid on and put the heat right down to the lowest setting on a gas cooker.  If you are using another kind of stove, bring the heat down to a 2-3 so that it’s just below a simmer.  You want to gently steam the vegetables without them catching on the bottom of the pan and without adding water.
  9. The dish is ready when the vegetables are cooked- about 10-15 mins.
  10. Garnish with fresh coriander and a little sprinkling of crushed fennel seeds if you like.

Serve with fresh naan or roti and yogurt.  This makes a great main dish or vegetable accompaniment.  Try it together with a dal for a complete vegetarian Indian meal.

*Meat- Free Tuesday* Acquiring Taste With Age: My Journey From Loathing To Loving Karelas

Being from a family of  longstanding foodies, there are not many edible things that I have yet to encounter if you discount most jungle survival food. (Even some of this I have tried.)  However, not all of the things I have tried have been love at first taste;  in fact some of them have taken me years to develop a taste for.  I particularly remember when I was younger there were a few Indian vegetables/dishes my family would cook that I would not look forward to eating at all.  One in particular I used to dread was karelas (bitter gourd).  They have a distinctive bitterness that was not appealing to me and I didn’t understand why the adults relished them so much.  I imagine they may have been appealing to kids that enjoyed bitter flavours  such as bitter lemon drinks or various penny sweets that had a bitter tang, but I was not one of those kids.  Firstly, I was definitely not a fan of penny sweets…the sugary, sweet, sour, fizzy, sometimes bitter, brightly coloured,  mostly jelified objects that you’d to find your friends smuggling into lessons.  You knew the sweets were coming out when you heard the signature rustle from their little neon candy-pink stripped paper bags coming from under their desks in order to get a mid lesson sugar rush/pick me up.  The only penny sweets that I bought from the tuck shop were cola bottles or white chocolate mice, but there were only so many of those I could eat before I felt sick.  Now I don’t think I could stomach them at all.

It was my birthday this past Sunday and I got to thinking about how my tastes have evolved as I have gotten older.  Bhindis, Punjabi Wadis, Karelas are all things that I never liked as a child and now that I am older I sometimes crave for!  I remember my mother making these dishes because she particularly loved them- especially Wadis.  She would bring stocks of them over from India on her trips as the ones you used to get here were never the same; fortunately we get some good imported ones now. Wadis look like hardened dumplings.  They are made from ground up lentil and mostly whole spices (you will be experiencing whole peppercorns guaranteed!) that are dried in the hot sun, which is why they taste so much better when they are from India; the Indian sun makes everything taste better. :)  To use the wadis, you must first fry them in some oil to release the aromas from the spices and cook the lentils.  You can then add them to various dishes in order to soften them as they are quite the tooth breaker if you attempt to eat them without some moisture softening them first!  My mother’s favourite way to cook them are with potatoes in a gravy or to add them to vegetable pilau for that added kick.  When we were younger, my sister and I would get very irritated and would have no choice but to religiously pick out any trace of wadis in whatever dish our mother added them to for her own enjoyment, but now that we’re older you may find us arguing over who is having the last one!

For my series of Meat-Free Tuesdays posts,  today I am sharing a simple recipe for Karela (bitter gourd).  Once a vegetable that I loathed, it has become one that I adore.  This dish  has the perfect balance of bitter from the karela, sourness from the amchoor powder (or lemon), sweetness and flavour from the onions, potatoes and spices; most importantly, the use of sauf ( fennel seeds) that just makes this dish sing!  My love affair with fennel seeds and their magical uses in Indian cookery will be a story for another day!  Karelas not only are delicious, they have many health benefits too.  In the Indian culture they are used for medicinal purposes to control blood sugar problems among many other diseases.

There are many ways in which you can cook karelas; they are particularly delicious left whole and stuffed with either spiced lamb kheema or a vegetarian spicy besan (chickpea flour) mix.  Today’s recipe is the easiest way I know to prepare them as well as my favourite.

Aromatic Bitter Gourd & Potato Subzi – Aloo Karela Subzi

Ingredients

  • 3-4 karelas (bitter gourds) scrapped a little on the outside and sliced into rounds  or 1 pack of frozen slices defrosted
  • 1-2 potatoes cut into thick chips or cubes- whatever you prefer
  • 1 onion chopped finely
  • 1 onion sliced
  • 1-3 green chilies-to taste
  • 1  plus 1/2 tsp cumin seeds
  • 1/2 tsp turmeric
  • 1 tsp whole fennel seeds
  • 1 tsp crushed fennel seeds
  • 1 tsp garam masala plus extra to taste
  • 1/2 tsp red chili powder (optional)
  • 2 1/2 tsp roasted ground coriander
  • 1/2- 1 tsp amchoor (dried green mango powder) or some lemon juice
  • 1- 2 tsp sugar/palm sugar/jaggery to taste
  • some roasted ground cumin for sprinkling
  • salt to taste
  • Oil

Method

  1. Take the karela slices and salt them generously and leave in a bowl for 15-20 mins.  After this time you will notice that there will be some liquid in the bowl.  Squeeze the karela slices well, pat with some kitchen paper to dry and set aside.  The liquid contains the bitterness.  This bitterness is what contains the goodness/medicinal properties in karelas, so the more you squeeze, the more you remove.  I give them a good squeeze, but not so much that they loose their shape or too much of the bitterness.
  2. In a wide based pan heat some oil- about 5-6 tbsp.  You will need to use oil generously when cooking karelas as they do not achieve a good flavour unless they are golden and they will got get golden without enough oil however hard you try!  You can however drain what remains after they are done if you choose to.
  3. Add  1/2 tsp cumin seeds and the well squeezed and patted dry karela slices and fry on a high heat until the slices get crispy edges and are golden- about 5-10 mins stirring frequently. When done, with a slotted spoon, remove the karela slices and set aside.
  4. You may need to add a tbsp or so of oil in the pan if there is none remaining from the frying of the karelas- you need about 2-3 tbsps in the pan at this stage.
  5. Add 1 tsp of cumin seeds and 1 tsp whole fennel seeds (if you really don’t like aniseed you can omit these, but they don’t taste aniseed-y in the same way that aniseeds do- particularly in this dish.   Instead they  add the most amazing dimension of taste of this dish) and allow to flutter before adding the finely chopped onions and green chilies.  Allow to fry until onions are translucent- about 3-4 mins
  6. Next add some spices- the ground coriander, garam masala, turmeric, red chili powder and some salt to taste- about 1 1/2 tsp is the standard amount I use in dishes.  Fry for about a minute.
  7. Add the potatoes and stir well.  Cover and cook on a low heat until half cooked- about 5-10 mins (depending on how large you cut the potatoes).
  8. Take the lid off and now add the sliced onion, karela slices, amchoor or lemon, sugar, and some extra garam masala if you like.  Stir well and cover and cook to allow the flavours to meld together and the sliced onions to soften and sweeten- about 10 mins.
  9. When cooked, remove from heat and stir well.  Taste for salt, sweetness and sour- adjust according to taste.  Don’t add too much sugar- there is not meant to be a sweet taste…the sugar is there purely to balance the flavours.  Sprinkle over the crushed fennel seeds, some roasted ground cumin and extra garam masala if you like.  Garnish with chopped coriander/cilantro if you have it and serve with a dal and or plain yoghurt and freshly made chapattis! Delicious!

A (small) change will do you good & My Sweet Potato Adventures with an Indian twist

Just as many of you out there, each year, as the new year draws closer I make my one of my reoccurring resolutions to live a healthier lifestyle. Full to the brim with enthusiasm and motivation,  we decide it is the optimum time to go on a “diet”, buy a gym membership, abstain from alcohol etc.  Once we pass the January Blues (January 23rd was supposedly the most depressing date this year) all this conscientious, extreme change manages to last until about mid February at the very best.

The whole point of a resolution is to follow through with something and make sure that you stick at it for the long run, right?  Very few people can adhere to strict rules and restrictions for long periods of time, and I am certainly not one of those people!  However, I do have a tendency to be passionate and obsess over anything new I get into- be it a hobby, a diet, cooking a kind of cuisine, researching a particular interest etc.  Unfortunately, I can lose interest just as easily if I get bored, or feel restricted.  What can I say?  I’m a stubborn bull and I like to do what I want to do. :) This year I decided to break the pattern.

As the new year approached, there were to be no more resolutions for me to obsess over for 2 months before I crashed and burned.  I made a decision to introduce small changes in my life that I would be happy to make, but more importantly, be able to sustain all year with the view to carrying them on indefinitely.  It meant the drastic instant results that I would usually aim for and sometimes achieve would not be happening, but I am content with this because I think the 80:20 rule fits me better than anything before:  being mindful and conscientious about what I am doing 80% of the time with that 20% of letting go bringing the balance I need.  No restrictions- just positive adjustments.  For example,  exercising regularly without the excuse of needing to go to the gym and in the kitchen, I am far more aware of not being overly excessive when it comes to fat, sugar and salt for everyday cooking.  It’s interesting to experiment and see if recipes work well with less or with interesting natural substitutes without compromising on the taste.  If not, not to worry because although with less frequency now, I will still enjoy these things and I will certainly not become fanatically against any of the things that I enjoy that may be deemed less healthy; we all know there are some things that need sugary, salty, buttery goodness! An example of this being, Kougin Amann, which I will be dedicating an entire day to make my own version in the near future!

It’s now March and I have to say that I have not felt this positive or energetic in a long time.  I feel a sense of freedom; I feel healthier and I am especially enjoying exploring and experimenting for the 80%.  The most important thing I have learnt is balance and this is slowly seeping into every aspect of my life.

************

Recently, I have had quite a craving for sweet potato and I would usually just roast them or make a mash as I would regular potatoes, but the other day I decided to try them out with some Indian flavours. After rummaging in the fridge, I pulled out a fresh bag of kale and some root ginger.  I don’t know why Gobi Aloo Sabzi (A spiced dry curry of cauliflower and potato)  came to mind.  I think it was the ginger.  I love ginger in Gobi Aloo and there is a kind of sweetness that I can relate to the Aloo when then are cooked with the Gobi and ginger that I thought would work well with the sweet potato.  I thought the kale’s earthy tang would balance the sweetness of the potato just as the stalks of the cauliflower in Gobi Aloo do.  I cooked it more or less the same way I would Gobi Aloo and the result was a resounding success! The sweet potato and kale worked and balanced together beautifully with the ginger and spices.  The bonus of this dish is that it takes no longer than 15-20 mins to prepare and have ready to serve on the table.  I will certainly be cooking this colourful, nutritious and utterly more-ish version of sweet potatoes for years to come!

 Spiced Sweet Potato & Kale-  Shakarkand & Kale Subzi

This makes a good size dish that can serve up to 8 people if it is being accompanied by other dishes.  It can also be eaten alone or with rice and/or chapatti.  It’s delicious accompanied with plain yoghurt. And don’t worry about the left overs! This keeps well for a few days in the fridge.

Ingredients

  • 600g  yellow sweet potato (about 1 large or 2 small) cubed into 1-2cm cubes If you can’t find yellow, you can use white.
  • 1 tennis ball onion finely chopped
  • 1 bag of curly spring kale  (approx 180g) cavolo nero would also work well or other similar leaves
  • 25g ginger  peeled and grated
  • 1 green chili chopped finely
  • 1 tsp cumin seeds
  • 1/2 tsp turmeric powder
  • 2 tbs dried fenugreek leaves ( Kasuri Methi) Avaliable in all Indian grocery stores.  If you can’t find it, you can leave it out as it is not essential
  • 2 tsp ground coriander seed powder
  • 1/4 red chilli powder (or to taste)
  • Salt to taste (about 1 1/2 tsp)
  • A few sprigs of coriander (cilantro) leaves chopped finely to garnish (optional)
  • Your choice of oil to cook with

Method

  1. Prepare all the ingredients as described above.
  2. Heat a wide based pan on medium high heat and add the cumin seeds to the dry pan.  Toss them once or twice to insure they don’t burn.  Once you start to smell the aroma from them add 3-4 tbsp of oil and let the seeds flutter.
  3. Now add the onions and green chilli and cook for a couple of minutes until the onions are slightly transparent.
  4. Add the ginger and stir for 10-20 seconds
  5. Add the spices- turmeric, red chilli,coriander and the salt and cook for about 1 min or so until you smell the rawness of the turmeric start to subside.  It will seem like the spices are sticking to the base of the pan if it is not non-stick, but don’t worry.  You don’t need to add more oil.  Just continue to stir.
  6. Now add the fenugreek leaves and stir for 10-20 seconds.
  7. Add the cubed sweet potato and stir to ensure they are coated well.
  8. Finally add the kale a handful or 2 at a time and thoroughly stir.
  9. When you have incorporated all the Kale, as you stir, bring the pan to a “boil” (put the pan on full heat for a minute) before putting a lid on it and turning the heat right down to a temperature that would be a very gentle simmer.  I say simmer, but there is no liquid in the dish and so I have given that as a reference for what temperature to use.
  10. Cook for about 10-15 mins depending on how large the pieces of sweet potato are.  The smaller they are, the quicker it will be.  Take off the lid half way and give it a stir.  The dish is cooked when the sweet potatoes are cooked.  Make sure you don’t over cook them to a mush, they are nicer when they still hold their shape.

Garnish and serve.

Bon  Appetit!